- Carmona
- Posts
- #3 Cover-ready Shape: My Process
When I was younger, my ultimate fitness goal was landing on the cover of Men’s Health magazine. At the time, I viewed the Men’s Health physique as the optimal balance between relative size and leanness. And by making the cover my goal, I assumed that I would—at minimum—achieve a physique comparable to the one that I saw on newsstands.
Twenty years later, I have not yet landed a magazine cover. That said, I have created enough content to know what goes into achieving the “cover-ready” look. This post shares the process that I follow when preparing for photo shoots.
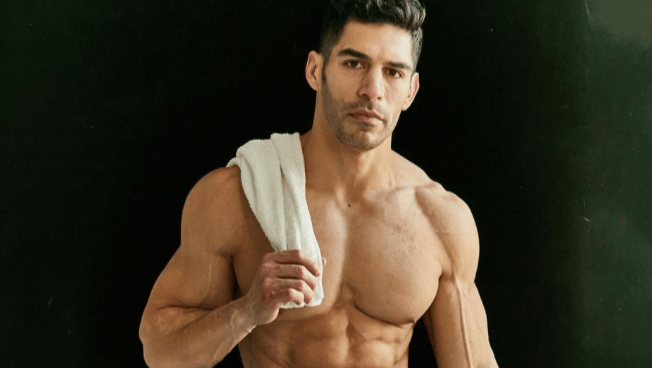
"Cover-ready” shape. November 2023.
Background
Let’s start with the basics.
Cover-ready shape is an illusion; it’s a temporary condition that people achieve and maintain for only brief periods of time. (Think hours, not days.) This illusion is created by 1) manipulating water and carbohydrate intake and 2) strategically depleting and replenishing muscle glycogen.
When combined, these tactics results in a physique that can appear simultaneously full and dry. By “full” I mean that the muscles appear pumped. By “dry”, I mean that the skin appears paper thin; it reveals everything—muscle separation, striations, and veins. When paired with studio-grade lighting, a full and dry physique can deliver that cover-ready look. You can see how this look comes together in the photo above. In this photo, my muscles appear pumped and you can see veins everywhere—my lower abdominals, quads, and shoulders.
A caveat
Before getting into the specifics, it’s worth noting that these preparation tactics work best for those who have sufficient muscle mass and are already relatively lean. These tactics should be understood as ways to optimize your physique. These tactics are not a panacea; they cannot deliver a visible six pack if you do not already have one.
For example, the photo below shows me approximately one week before my last photo shoot (i.e., ~week prior to the photo above). It’s easy to see that I’m essentially ready for the photo shoot. I had a six pack and enjoyed vascularity throughout my chest, arms, and lower core. (This photo was taken immediately post-workout, so take the size and vascularity with a grain of salt.) The only thing missing is the “dry” look. My skin is still holding quite a bit of water, which is why my abdominals appear flat-ish relative to the cover-ready example from a week later.
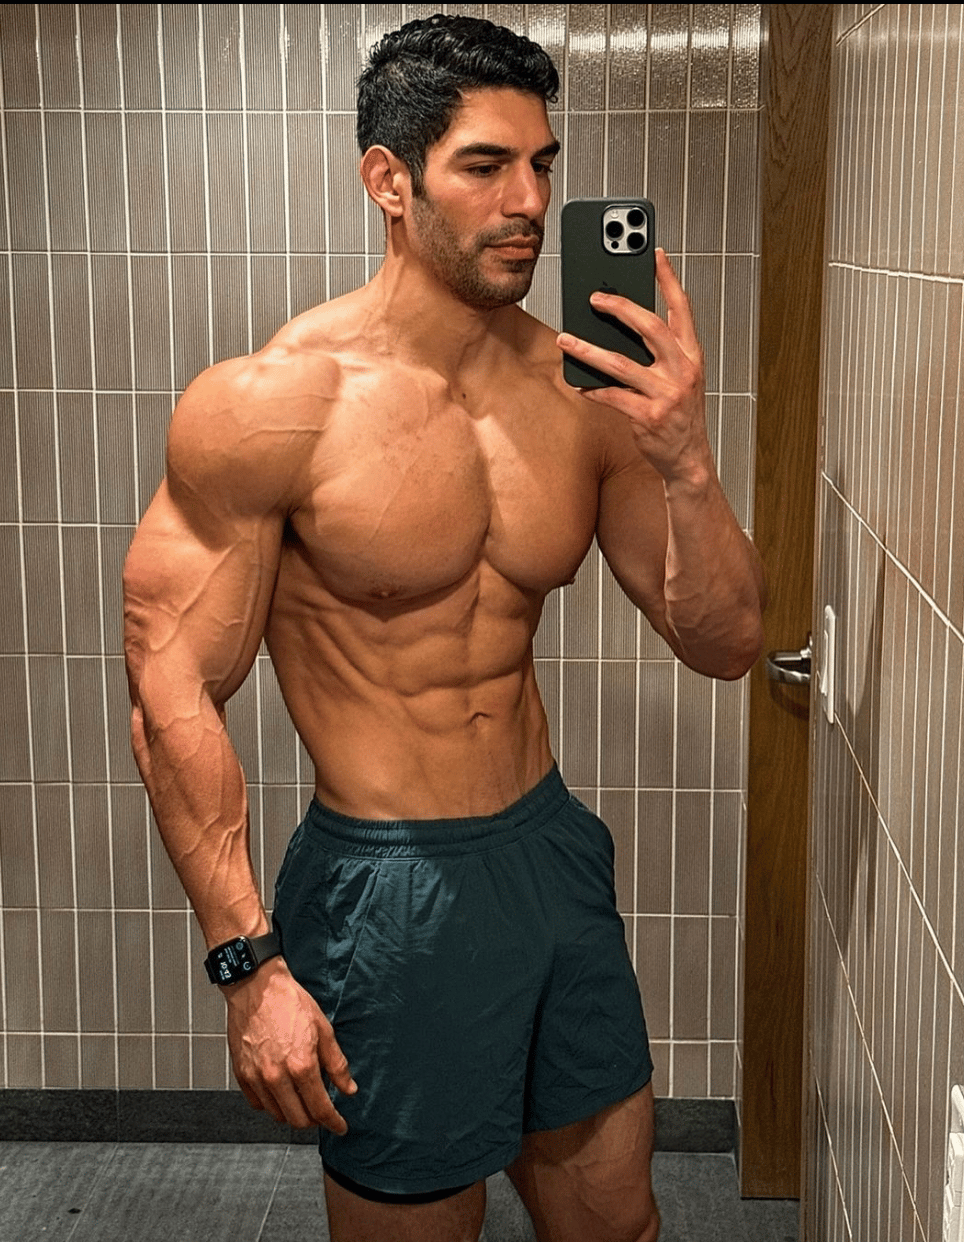
A week before my November 2023 photo shoot.
The Process
Let’s assume that you are lean enough and want to get into cover-ready shape. How should you prepare?
My cover-ready process is mostly adapted from a six-day program outlined in this T-Nation article. I follow the general guidelines, but make a few adjustments, which I outline below.
Lower the water intake. The water guidance in the T-Nation article is quite aggressive. Drinking too much water in too short a period of time can actually lead to quite severe health effects. As a result, I aim drink less water during my preparation (i.e., 2.0-2.5 gallons/day) than recommended by T-Nation and closely monitor how I feel throughout the day. If begin to get a headache, then I stop drinking water until I feel normal again.
Avoid recommended supplements. Keep it simple. I do not know the side effects of the supplements listed in the T-Nation article, so I ignore them. Ideally, we’re not introducing net-new foods during the preparation process. During my process, I also cut out supplements such as creatine.
Carbohydrate flexibility. I aim to hit the recommended carbohydrate guidance (<60g/day) during the first three days of prep. That said, I am comfortable going slightly over ±15g. I have followed this process a few time and know that a few extra carbohydrates will not sabotage the final outcome.
Lastly, please consult a doctor if you have concerns about how your body might respond to this preparation process.
Day-by-Day
Below, I outline my entire six-day process—water, food, and training guidance. I typically schedule my photo shoots for Monday mornings so that I can get through the more disruptive days (i.e., Days 4 and 5) over the weekend.
Day 1
Water: 2.0-2.5 gallons
Food: <60g carbs. No protein/fat restrictions.
Workout: Full-body, with one exercise per body part. 3-4 sets, 10-12 reps each. Fully contract the muscles during each rep. Remember, we’re trying to deplete the muscle glycogen.
Day 2
Water: 2.0-2.5 gallons
Food: <60g carbs. No protein/fat restrictions.
Workout: Full-body, with one exercise per body part. Prioritize different exercises. If you did dumbbell press the day before, then do flies on this day. 3-4 sets, 10-12 reps each.
Day 3
Water: 2.0-2.5 gallons
Food: <60g carbs. No protein/fat restrictions.
Workout: Upper body emphasis. Again, switch up the exercises. 3-4 sets, 10-12 reps each.
Day 4
Water: 2.5-3.0 gallons
Food: No solid foods. I drink protein shakes for meals and snacks.
Workout: N/A
Day 5 (i.e., “Shoot Eve”)
Water: 8 oz glasses with the first few meals. Stop drinking water around 2-3PM* (*Assumes a morning photo shoot).
Food: Follow the meal plan outlined below. In general, I target 50-75g carbohydrates during each meal. Per the T-Nation guidance, I also try to minimize 1) sodium intake and 2) gluten-based carbohydrates.
Workout: Train muscles that you want to “pop” the following day.
Meal | Details |
|---|---|
Meal 1 (7AM) | For this serving of carbohydrates, start with fruit. I eat a fruit salad, slices of pineapple, and a banana. Standard protein/fats are fine. I’ll have coffee at this meal. |
Meal 2 (10AM) | Starchy carbohydrates. I get the entire 50-75g from sweet potatoes. Standard protein/fats are fine. Keep water below 8oz. |
Meal 3 (12PM) | Starchy carbohydrates. I get the entire 50-75g from sweet potatoes. Standard protein/fats are fine. Keep water below 8oz. |
Meal 4 (3PM) At this point, you should see your body begin to respond to the carb-loading. Look for more vascularity, definition, and a tighter waist. | Starchy carbohydrates. I get the entire 50-75g from sweet potatoes. Standard protein/fats are fine. Keep water below 8oz. After this meal, sip water as needed. |
Meal 5 (7PM) | For this meal, I eat sushi or something other than sweet potatoes. At this point, I’m sick of sweet potatoes. Standard protein/fats are fine. Sip water as needed. |
Meal 6 (8/9PM) | Optional meal. The “anything goes” meal. This meal is meant to help you eke out that last bit of fullness. I typically opt for a cookie and one other sugary snack. Sodium is not a big concern with this meal. Sip water as needed. |
Day 6 (i.e., “Shoot Day”)
Water: Sip as needed until the photo shoot is complete.
Food: See meal plan below.
Workout: N/A
Meal | Details |
|---|---|
Meal 1 (7AM) | For breakfast, I eat a high-sodium, high-sugar meal. I opt for a small breakfast sandwich and a muffin. |
Meal 2 (9AM*) *Assumes the photo shoot is at 10AM | Before leaving for the shoot, I’ll have a high-sugar cookie. This will help make the muscles begin to pop. |
Thought the photo shoot (10AM+) | During the photo shoot, I eat high-carbohydrate snacks throughout. The goal is to keep the muscles appearing full and the vascularity high. I’m a fan of these bars. |
And there you have it! Let’s get into cover-ready shape!